🔌 Hardware guide · DMX output

Wiring your DMX output
Art-Net node & USB interfaces

Pick your box, then Windows or macOS : the exact procedure appears, with the values to enter and the pitfalls specific to your system. The page then covers universes, output routing and verification.

By MyStrow · Updated on 5 August 2026 · ⏱ Setup : 5 to 10 min
Set up my output → Download MyStrow ↓

01 Configurator : your hardware, your procedure

Two questions, then the exact procedure. Everything then happens in a single window in the software : Connection ▸ 🌐 DMX Output ▸ ⚙️ Configure output.

1 What is written on your box ?

Turn it over : the model name is printed on the top or on the connector face. Click the one that matches.

Another name ? Then look at the connectors on the box :
Torn between the last two ? Go with “open” : if the box is in fact a Pro, the output simply will not start and all you have to do is change the “Interface” line in the software. No risk to the hardware.
2 On which computer ?

Art-Net node

Windows
1

Plug in the two cables

One RJ45 cable straight between the PC and the node (no switch, no Wi-Fi), and the power : square USB-B or USB-C depending on the model. Check that the LED on the box lights up.

2

Set up the node in its utility

For ElectroConcept nodes, with the box plugged in and powered, open dmx-tools.electroconcept.fr and enter :

DMX Parameters
DMX Mode: OUT · Universe OUT: 0 · Universe IN: 1 · OUT Mode: Fixed · FPS Fixed: 40
Network Parameters
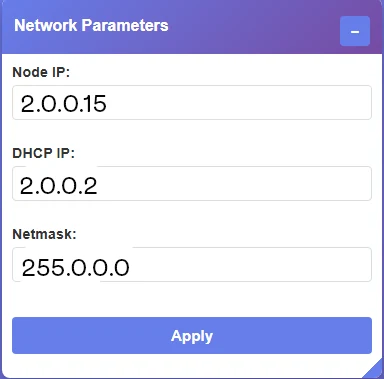
Node IP: 2.0.0.15 · DHCP IP: 2.0.0.2 · Netmask: 255.0.0.0

Confirm, then unplug and replug the USB : the node restarts on its new address. It ships set to 2.0.0.1, and 2.0.0.15 is the address MyStrow targets by default — stick to it and you will have nothing to enter in the software.

On another node (ENTTEC ODE, DMXKing eDMX…), the utility changes but the settings are the same : Art-Net protocol, output set to OUT, universe 0, IP 2.0.0.15 / netmask 255.0.0.0.
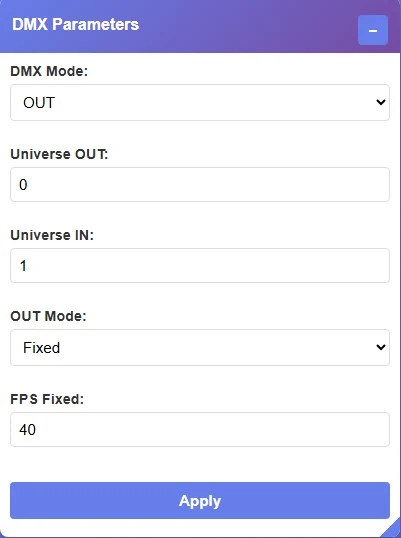
DMX Parameters tab of DMX TOOLS ElectroConcept
Tab DMX Parameters.
Network Parameters tab of DMX TOOLS ElectroConcept
Tab Network Parameters.
3

Set the PC's network adapter to 2.0.0.1

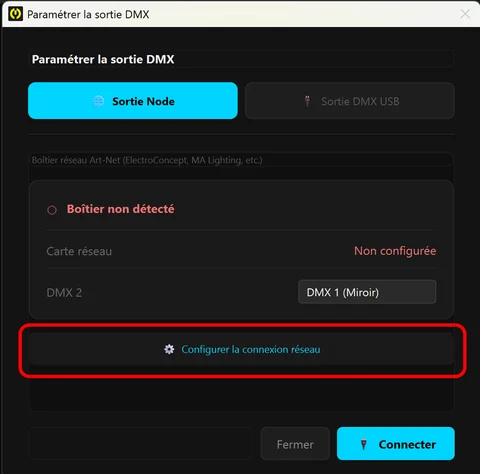
In MyStrow : Connection ▸ 🌐 DMX Output ▸ ⚙️ Configure output, tab 🌐 Node output, button ⚙️ Configure the network connection. The wizard checks the cables, lists the Ethernet adapters, and the Configure automatically ✓ button applies 2.0.0.1 / 255.0.0.0 to the one you point at.

Automatic configuration requires administrator rights. If it fails, the wizard falls back to the manual page : button 🔑 Restart as administrator, or set it by hand — right-click the adapter ▸ Properties ▸ TCP/IPv4 ▸ Properties ▸ “Use the following IP address” ▸ 2.0.0.1, netmask 255.0.0.0, gateway empty.
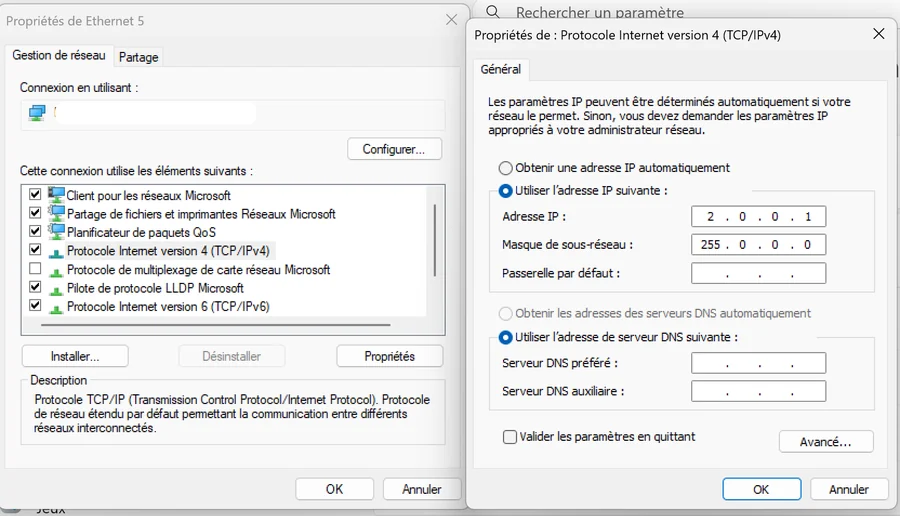
Windows network adapter properties set to fixed IP 2.0.0.1 for an Art-Net node
The equivalent manual setting, in Windows.
Configure the network connection button in MyStrow's Set up the DMX output window
The button ⚙️ Configure the network connection does it for you.
4

Allow MyStrow through the firewall

On the first transmission, Windows shows an authorisation prompt : tick Private networks and confirm. Art-Net goes out over UDP on port 6454 ; if you refuse, the prompt never comes back and the node stays silent.

Already refused it by mistake ? Windows Defender Firewall ▸ Allow an app ▸ tick MyStrow for private networks.
5

Connect, then route the outputs

Tab 🌐 Node output : the status turns green as soon as the box answers, then click 🔌 Connect. In the Output routingtable, say which universe goes to which physical socket (see Universes & routing).

Quick check : Connection ▸ 🩺 Diagnostics ▸ 🌐 RJ45 test (network / Art-Net node) checks the network adapter, the ping and the node's Art-Net reply.

Wi-Fi : avoid it. Art-Net copes badly with packet loss and the variable latency of a wireless network — the lights “stutter”. Wired for the node, Wi-Fi for the control tablet.
Art-Net node

macOS
1

Plug in the two cables

One RJ45 straight between the Mac and the node, and the power (USB-B or USB-C depending on the model). With no Ethernet port, use a USB-C → Ethernet adapter : it shows up as a full network adapter.

2

Set up the node in its utility

For ElectroConcept nodes, with the box plugged in and powered, open dmx-tools.electroconcept.fr (Safari or Chrome) and enter :

DMX Parameters
DMX Mode: OUT · Universe OUT: 0 · Universe IN: 1 · OUT Mode: Fixed · FPS Fixed: 40
Network Parameters
Node IP: 2.0.0.15 · DHCP IP: 2.0.0.2 · Netmask: 255.0.0.0

Confirm, then unplug and replug the USB. 2.0.0.15 is the address MyStrow targets by default. On another node the names change but not the values : Art-Net, OUT, universe 0, 2.0.0.15 / 255.0.0.0.

DMX Parameters tab of DMX TOOLS ElectroConcept
Tab DMX Parameters.
Network Parameters tab of DMX TOOLS ElectroConcept
Tab Network Parameters.
3

Set the Mac's IP by hand

System Settings ▸ Network ▸ select the Ethernet interface (or the USB-C adapter) ▸ Details… ▸ tab TCP/IPConfigure IPv4 : Manually.

IP address
2.0.0.1
Subnet mask
255.0.0.0
Router
(leave empty)

Then OKApply. In MyStrow, the wizard's 📂 Open network connections button takes you straight to that panel.

On Mac, there is no automatic configuration. The wizard's “Configure automatically” button relies on Windows commands : on macOS, the manual entry above is what counts.
The Mac can stay connected to Wi-Fi for the internet : traffic to 2.0.0.15 will leave through the Ethernet port, which carries the 2.x addressing plan.
4

Allow MyStrow on the local network

System Settings ▸ Privacy & Security ▸ Local Network ▸ enable MyStrow. macOS asks the question on first launch ; if it was refused, this is where you fix it.

Pitfall no. 1 on Mac. Without that permission, macOS blocks Art-Net silently : no error, no message — the node simply never answers and the output stays dead. After enabling it, quit and relaunch MyStrow.
5

Connect, then route the outputs

Connection ▸ 🌐 DMX Output ▸ ⚙️ Configure output, tab 🌐 Node output : green status, then 🔌 Connect. Then set the Output routing table (see Universes & routing).

Quick check : Connection ▸ 🩺 Diagnostics ▸ 🌐 RJ45 test (network / Art-Net node).

Wi-Fi : avoid it for the node itself — packet loss and variable latency make the lights “stutter”. Wired for DMX, Wi-Fi for the control tablet.

“Pro” USB interface (ENTTEC DMX USB Pro, Eurolite MK2)

Windows
1

Plug in before opening the window

Into a direct USB port on the PC, preferably at the back on a tower ; avoid unpowered hubs. Plug it in before opening the DMX output window, so the port is already listed.

2

Check the driver

These boxes use an FTDI chip : Windows installs the driver by itself in the vast majority of cases. To check : Device Manager ▸ Ports (COM & LPT) — you should see a line like USB Serial Port (COM4).

Nothing shows up, or a yellow exclamation mark ? Install the FTDI VCP driver (ftdichip.com) or the manufacturer's one, then plug the box back in.

3

Select and connect

Connection ▸ 🌐 DMX Output ▸ ⚙️ Configure output, tab 🔌 USB DMX output :

  • Interface : “ENTTEC DMX USB Pro” or “Eurolite USB-DMX512 PRO (MK2)”.
  • COM port : the one belonging to the interface — FTDI chips are marked with a . The button re-runs the detection.
  • 🔌 Connect : this button, and only this button, actually switches the software's output over. Opening the tab is not enough.
Nothing to choose on the protocol side : MyStrow talks to these boxes with a packet protocol, and the internal microcontroller builds the DMX frames. That is what makes them so stable.
4

Check

The LED on the box turns green when the output is active. To go further : Connection ▸ 🩺 Diagnostics ▸ 🔌 USB test (DMX interface) — the wizard offers ▶ Run the diagnostic (port, driver, actual transmission) and 💡 100% test, which sends full on across every channel.

One piece of software at a time on the box. A manufacturer utility or another lighting application holding the port makes the output erratic (flickering, “port not open”). Close everything else before connecting.

“Pro” USB interface (ENTTEC DMX USB Pro, Eurolite MK2)

macOS
This is the most reliable solution on Mac. The box generates the DMX signal itself : the output depends neither on the machine's load nor on the installed drivers.
1

Plug in before opening the window

Into a direct USB port (or a good-quality USB-C adapter). Plug it in before opening the DMX output window.

2

Do not install any driver

macOS ships its own FTDI driver. The box appears on its own as /dev/cu.usbserial-XXXXXXXX.

Do not add FTDI's VCP driver on top : it duplicates the ports and makes the selection ambiguous. If you have already installed it, uninstall it before troubleshooting.
3

Select and connect

Connection ▸ 🌐 DMX Output ▸ ⚙️ Configure output, tab 🔌 USB DMX output :

  • Interface : “ENTTEC DMX USB Pro” or “Eurolite USB-DMX512 PRO (MK2)”.
  • COM port : the /dev/cu.usbserial-… entry (marked for FTDI chips). The button re-runs the detection. The “COM port” label is carried over from Windows ; on Mac it does refer to the ports named cu.*.
  • 🔌 Connect — this is the button that actually switches the output over.
4

Check

The LED on the box turns green. For a full test : Connection ▸ 🩺 Diagnostics ▸ 🔌 USB test (DMX interface)▶ Run the diagnostic, then 💡 100% test.

One piece of software at a time on the box : close every other lighting application or manufacturer utility before connecting.

“open” USB adapter (Open DMX, OPTO OPEN DMX, UltraDMX Micro, FTDI clones)

Windows
1

Plug in and install the FTDI driver

Direct USB port, no unpowered hub. Windows usually installs the driver by itself ; otherwise install the FTDI (VCP + D2XX) package from ftdichip.com, then plug it back in.

On these passive boxes, MyStrow drives the FTDI chip directly (D2XX), just like QLC+ : that is what sets the Latency Timer to 1 ms and produces a clean sync signal. Through the plain serial port, the timing would be broken and the fixtures would ignore every frame — without a single error being shown.
2

Close everything holding the chip

Manufacturer utility, another lighting application, a second instance of MyStrow : only one program can open the box. Two, and the output becomes erratic.

3

Select and connect

Connection ▸ 🌐 DMX Output ▸ ⚙️ Configure output, tab 🔌 USB DMX output :

  • Interface : “ENTTEC Open DMX USB”, “OPTO OPEN DMX (ElectroConcept)”, “DMXKing UltraDMX Micro”, or “Other USB-DMX interface” for every FTDI clone.
  • COM port : FTDI chips are marked with a . The button rescans.
  • 🔌 Connect.
Once connected, the COM port may disappear from the list : that is normal, the chip is reserved for direct access. It comes back when you disconnect.
4

Box silent even though everything is green ? The RTS/DTR test

Connection ▸ 🩺 Diagnostics ▸ 🔌 USB test (DMX interface)🔌 RTS/DTR test.

On these adapters, the pin that enables RS485 transmission is sometimes wired to the RTS or DTR control lines — and those are asserted by default when the port opens, which leaves the output completely silent, with no error. The test sweeps all four combinations, asks you which one lights the fixtures up, and the setting is remembered.

Before that, run the usual checks : 💡 100% test to send full on, with the master and the faders up, and a 120 Ω terminator at the end of the line.

“open” USB adapter (Open DMX, OPTO OPEN DMX, UltraDMX Micro, FTDI clones)

macOS
1

Plug in, install nothing

Direct USB port (or a quality USB-C adapter). macOS ships its FTDI driver : the box appears as /dev/cu.usbserial-XXXXXXXX.

Do not install FTDI's VCP driver on top of Apple's : it creates duplicate ports and muddles the selection.
2

What MyStrow does on Mac

On macOS, direct access to the chip (D2XX) is not available : MyStrow goes through the serial port and generates the DMX sync signal by toggling the baud rate. That is the method that actually works on Mac — the standard break command succeeds there without error but produces no valid electrical signal, which gives you a perfectly silent box and a perfectly green piece of software.

Nothing to adjust : it is automatic. Just remember that with this kind of box, the frame rate depends on the machine — for live work, a Pro interface remains safer.
3

Select and connect

Connection ▸ 🌐 DMX Output ▸ ⚙️ Configure output, tab 🔌 USB DMX output :

  • Interface : “ENTTEC Open DMX USB”, “OPTO OPEN DMX (ElectroConcept)”, “DMXKing UltraDMX Micro” or “Other USB-DMX interface”.
  • COM port : the /dev/cu.usbserial-…, marked . The button rescans.
  • 🔌 Connect.
4

Box silent even though everything is green ? The RTS/DTR test

Connection ▸ 🩺 Diagnostics ▸ 🔌 USB test (DMX interface)🔌 RTS/DTR test.

The pin that enables RS485 transmission is sometimes wired to the RTS or DTR lines, which are asserted by default when the port opens : silent output, no error. The test sweeps all four combinations and remembers the one that lights your fixtures up.

Before that : 💡 100% test, master and faders up, 120 Ω terminator at the end of the line.
The basics, if the words “channel”, “universe” or “Art-Net” mean nothing to you
  • Channel — a value from 0 to 255. A simple LED PAR uses 5 (dimmer, R, G, B, strobe), a moving head 16 or more.
  • Universe — a bundle of 512 channels, that is one physical DMX line. Bigger rig = second universe = second output.
  • Address — the start channel set on the fixture. It must match the MyStrow patch exactly.
  • Art-Net — DMX carried over the network, in UDP on port 6454. This is what MyStrow sends to a node.

MyStrow re-sends the whole universe several dozen times a second : that is how DMX normally works. So a fixture that “holds” a color when everything is off is never a buggy fixture — it is the output that has stopped talking to it.

02 Universes and output routing

One universe = 512 channels = one XLR line. Beyond that — typically when you add moving heads — you have to spread the fixtures across several universes, which means a node with several outputs.

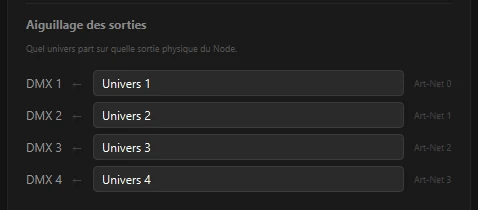
With the node connected, the DMX output window shows the Output routingtable : for each physical socket on the box (DMX 1 to DMX 4) you choose which universe is sent there, or Disabled.

ScenarioSettingResult
Standard install DMX 1 ← Universe 1, DMX 2 ← Universe 2, and so on. Each output carries its own universe.
Doubling a line (mirror) Two outputs on the same universe The same signal leaves on two sockets : both sides of the stage with no splitter.
Isolating a line while setting up The output set to Disabled The socket stops sending anything, the others carry on.
DMX output routing table of a node in MyStrow
Each physical socket on the node gets the universe of your choice, or nothing at all.

The patch stays in charge. Routing does not change the addressing : it is in the patch that each fixture gets its universe and its start address. Two devices whose ranges overlap will react together no matter what — the patch's ⚡ Auto-addressing function fixes that in one click.

03 Check that DMX really is going out

A green status means “the box is open”, not “your fixtures are receiving something”. The only test that counts is physical, and it comes down to four points.

  • Bring up the master and the fader of the group concerned : without them, everything goes out at zero.
  • Send full white to a single fixture, the one closest to the interface.
  • Let the test run for several seconds. A fixture needs to receive several frames before lighting up ; a half-second pulse goes unnoticed.
  • Watch the receive LED on the fixture or the box : it blinks as soon as a valid DMX signal arrives, even if the addressing is wrong.

The LED blinks but nothing lights up : the signal is arriving, the problem is downstream — fixture address, universe, or a DMX mode different from the one declared in the patch. It does not blink : the problem is upstream — interface, cable, or an output not connected in the software.

Hardware ready ?

Move on to what's next : patching your fixtures, then programming your first sequences.

Download MyStrow ↓ See the compatible interfaces →